What CRSP Exam Day Is Actually Like: The Test Center, the Software, and the Review-and-Submit Flow
Before I sat the CRSP in February 2026, the thing that made me most anxious wasn’t the content — it was not knowing what the day would feel like. Where do I go? What do they ask for? What does the screen actually look like when I sit down? This post walks through exactly that, start to finish. I can’t recall specific questions (that’s bound by BCRSP test-security rules), but the logistics and the software flow are exactly what you’ll experience — and knowing them ahead of time removes a whole layer of stress.
You book a date and a test center in advance. On the day you arrive early, hand over two pieces of photo ID, go through a security check, and get assigned a locker for your belongings. A proctor walks you to a computer and gives you a pencil and scratch paper. Your timer only starts when you start the exam — not when you arrive. The screen shows a case scenario on the left and its questions on the right, with 4–5 questions sharing one scenario. Answer what you know, flag what you’re unsure of, and leave nothing that costs you time you don’t have. Finishing the last question does not submit — it takes you to a review page listing every question’s status (answered / not answered / flagged). Clean up your flags and blanks, keep a minute or two in reserve, then submit. Results come in about 4–6 weeks. Then you log out and go home.
Weeks before: booking your date and location
The first concrete step is scheduling. Once you’re approved to sit the exam, you choose an exam date and a test-center location that works for you. Pick a center you can get to comfortably — the last thing you want on exam morning is a stressful commute or a parking scramble eating into your calm. Book early enough that your preferred date and location are still available, and treat the confirmation email as your anchor: it has your appointment time, the address, and the ID rules.
My advice: schedule your real exam for a date that gives you a clear final week of light review, not cramming. And in that final week, do at least one full-length, timed run under exam-like conditions so the day itself feels familiar rather than foreign. (More on why that matters at the end.)
Arriving at the test center
Get there early — aim for 30 minutes before your appointment. Here’s the check-in sequence, step by step:
Show two pieces of photo ID
The center asks for two valid IDs, and at least one is typically a government-issued photo ID (passport, driver’s licence). The names must match your registration exactly. Check the specific ID requirements in your confirmation email before you leave the house — a mismatch can cost you the appointment.
Go through the security check
Expect a check similar to other proctored testing: no phones, no notes, no smart watches in the room. Pockets are usually checked. It’s routine — not something to be nervous about — but plan to have nothing on you that you’d have to explain.
Get assigned a locker
Your phone, bag, keys, jacket — everything goes into a small locker. Take out only what you’re allowed to bring in. Leaving your phone truly out of reach is oddly calming; there’s nothing to check for the next few hours except the exam.
Get walked to your exam station
A proctor escorts you to an assigned computer station. You don’t pick your own seat; you’re placed. Take a breath and get comfortable — adjust the chair, note where the clock/timer is on screen.
Receive a pencil and scratch paper
You’re given a pencil and scratch/erasable paper for working through calculations or jotting notes. You can’t bring your own. Use it — writing down a quick elimination or a units conversion keeps your head clear.
Logging in: the first thing you see
You sit down and log in to the exam on the computer. Before the questions begin, there’s usually an intro/agreement screen and a chance to get oriented to the interface. This is the moment where familiarity pays off: if you’ve practised in software built to look like the real thing, the layout is instantly recognizable and you don’t waste any mental energy figuring out where things are.
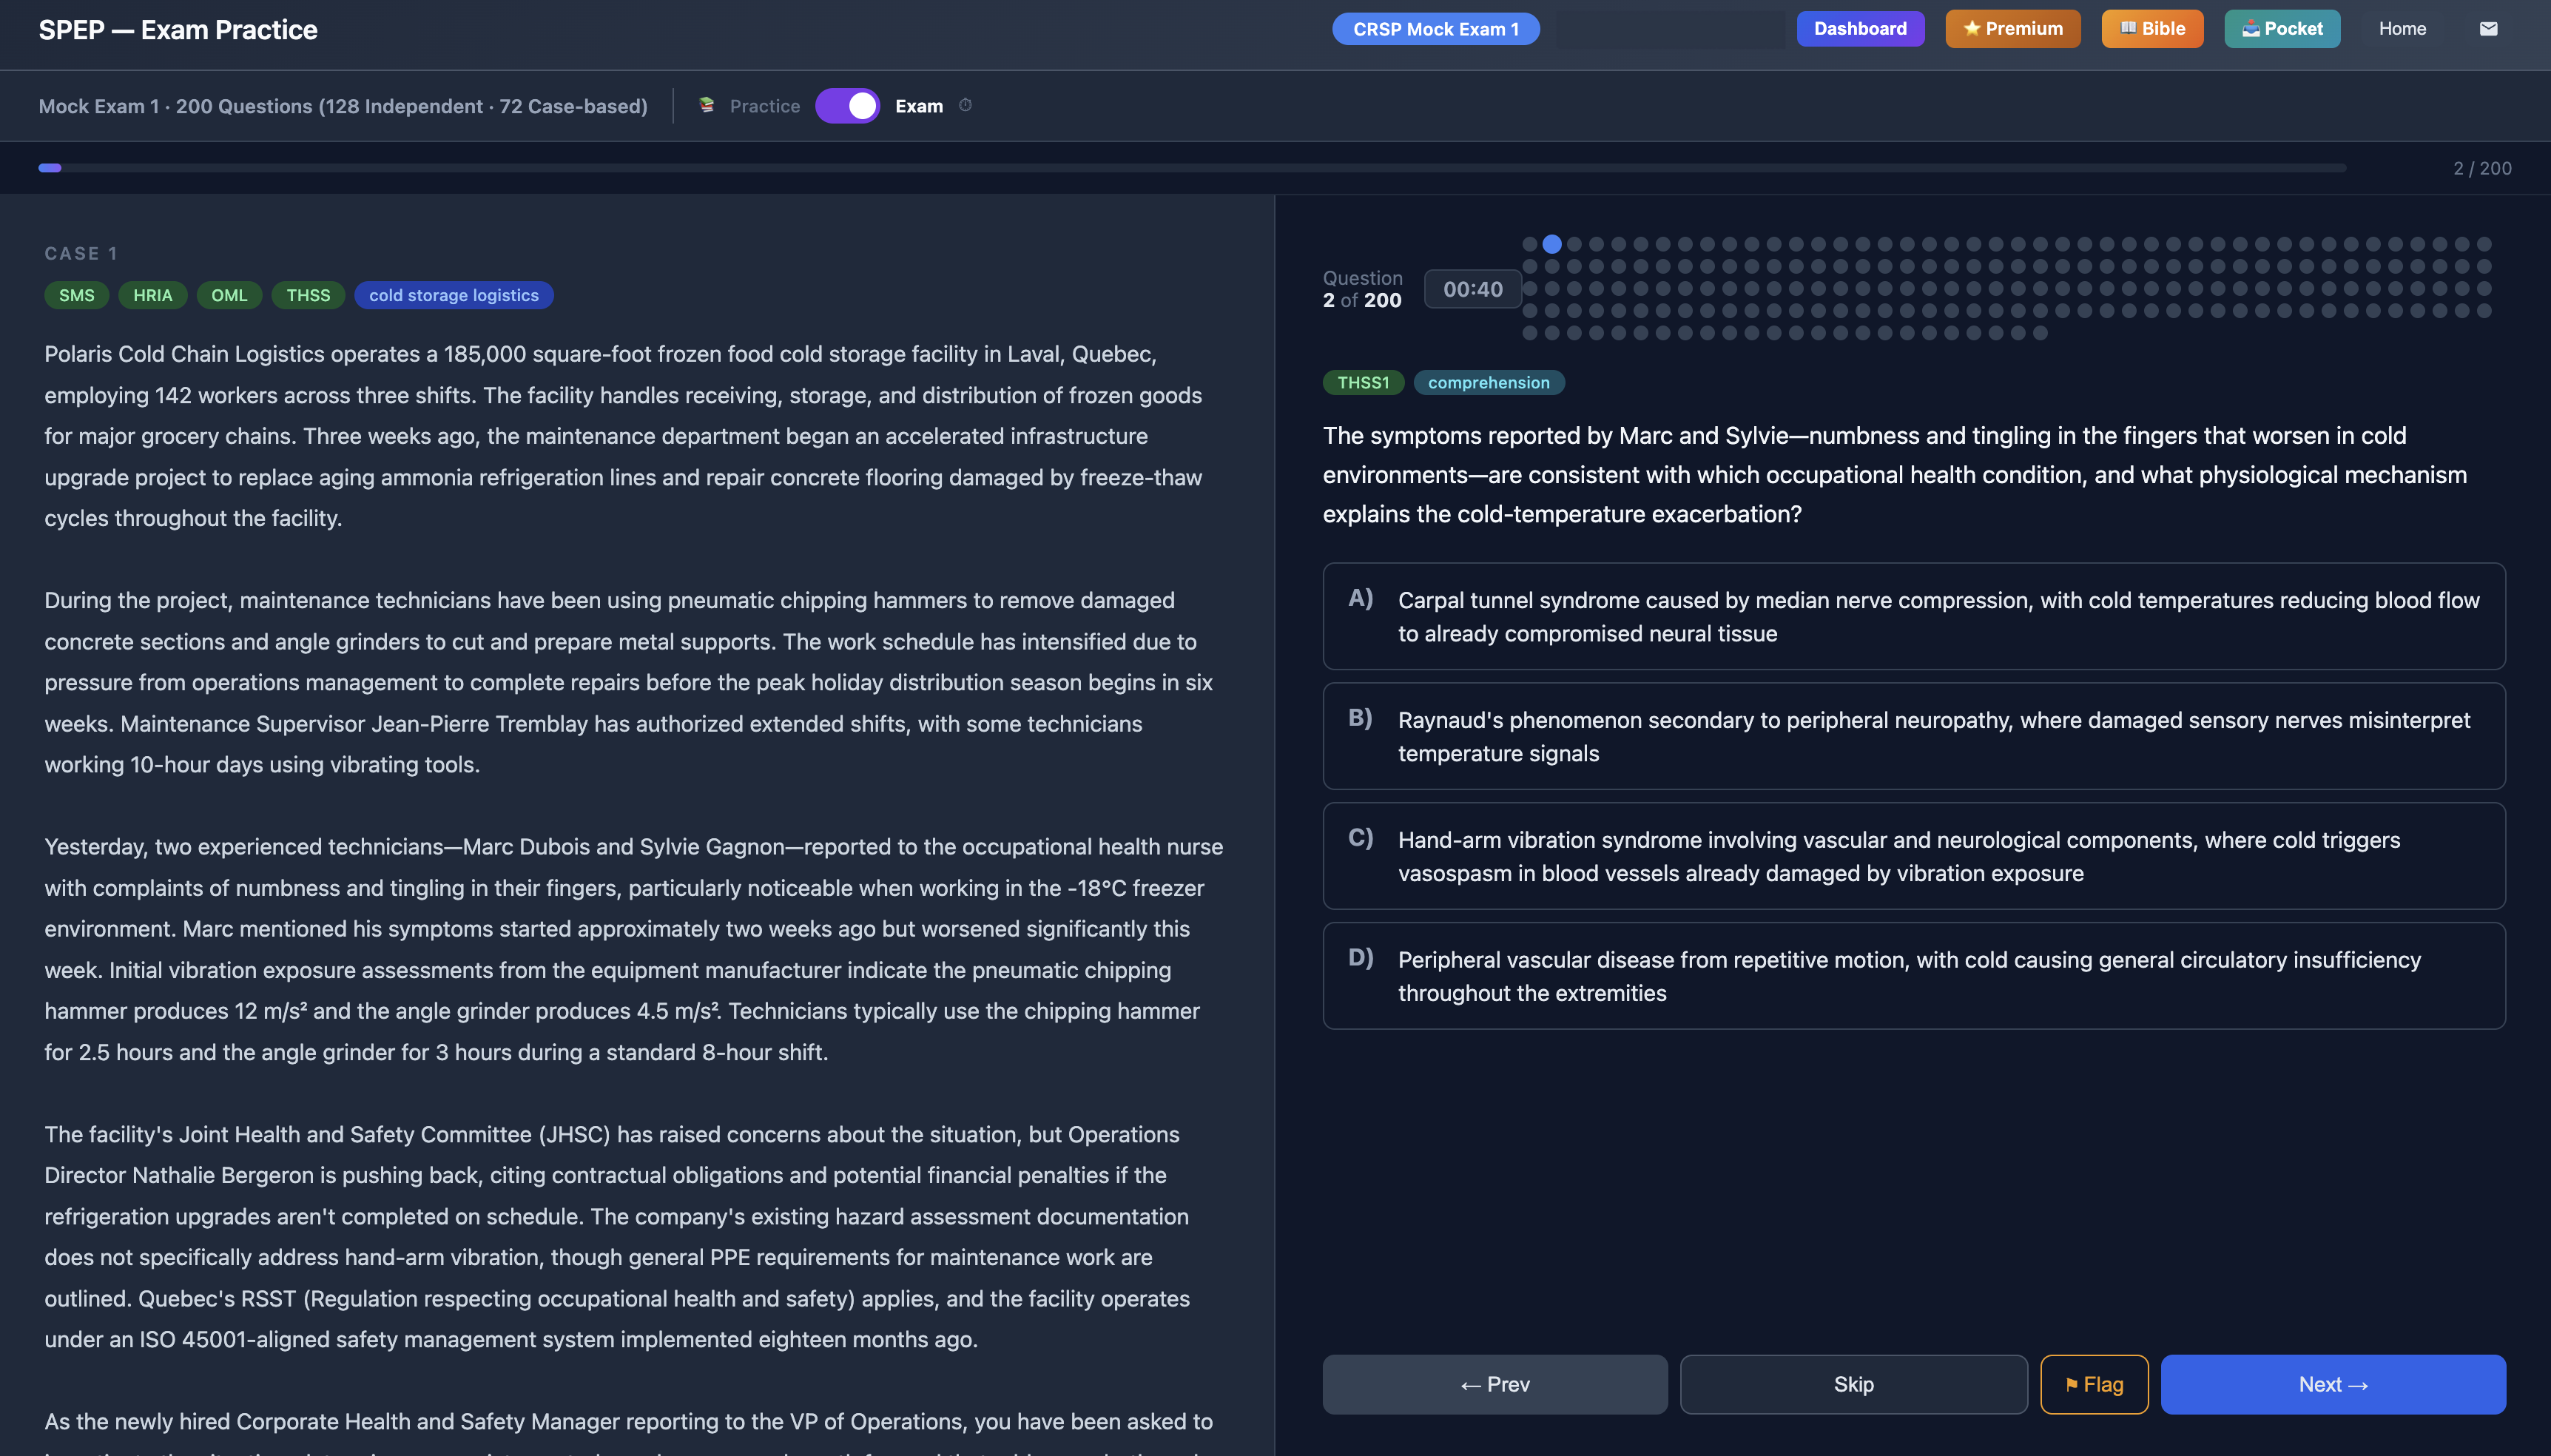
How the screen is laid out
For case-based questions, the screen is split. On the left is the scenario — a realistic workplace situation, usually one to a few paragraphs. On the right is the current question and its answer choices. A single scenario is shared by 4–5 questions, so you’ll read that scenario once and then answer several questions that all draw on it before moving to a new scenario. There are also independent questions that stand on their own without a scenario.
There’s a visible question navigator (a grid of question numbers) so you always know where you are and can jump around, plus a clear timer at the top. Getting used to glancing at that timer — without letting it rattle you — is part of the skill.
How to actually answer
Here’s the simple decision rule I used on every single question:
If you know it — answer it and move on
Don’t linger on questions you’re confident about. Lock the answer, move forward, keep your pace.
If you’re unsure — make a call, then flag it
You have two clean options. Either leave it blank and flag it to come back to, or — better in most cases — choose the answer you believe is most likely and still flag it. That way if you run out of time, you’ve at least got your best guess locked in, but the flag reminds you to revisit it if time allows. Never leave a question silently uncertain: either it’s answered, or it’s flagged, or both.
The timer starts when you start — not when you arrive
This is worth saying clearly because it removes a common worry: your exam clock does not start when you walk into the building or check in. All that logistics time — ID, security, locker, being seated — is off the clock. The timer begins when you begin the exam, and from that point a visible countdown shows exactly how much time you have left. So don’t rush the check-in, and don’t panic if it takes a while; none of it eats your exam time.
The last question doesn’t submit — the review page does
Here’s the part that surprises people, and it’s the single most reassuring thing to know in advance: completing the last question does not end the exam. Instead, you’re taken to a review screen that lists every question and its status — answered, not answered, and flagged — all in one place.
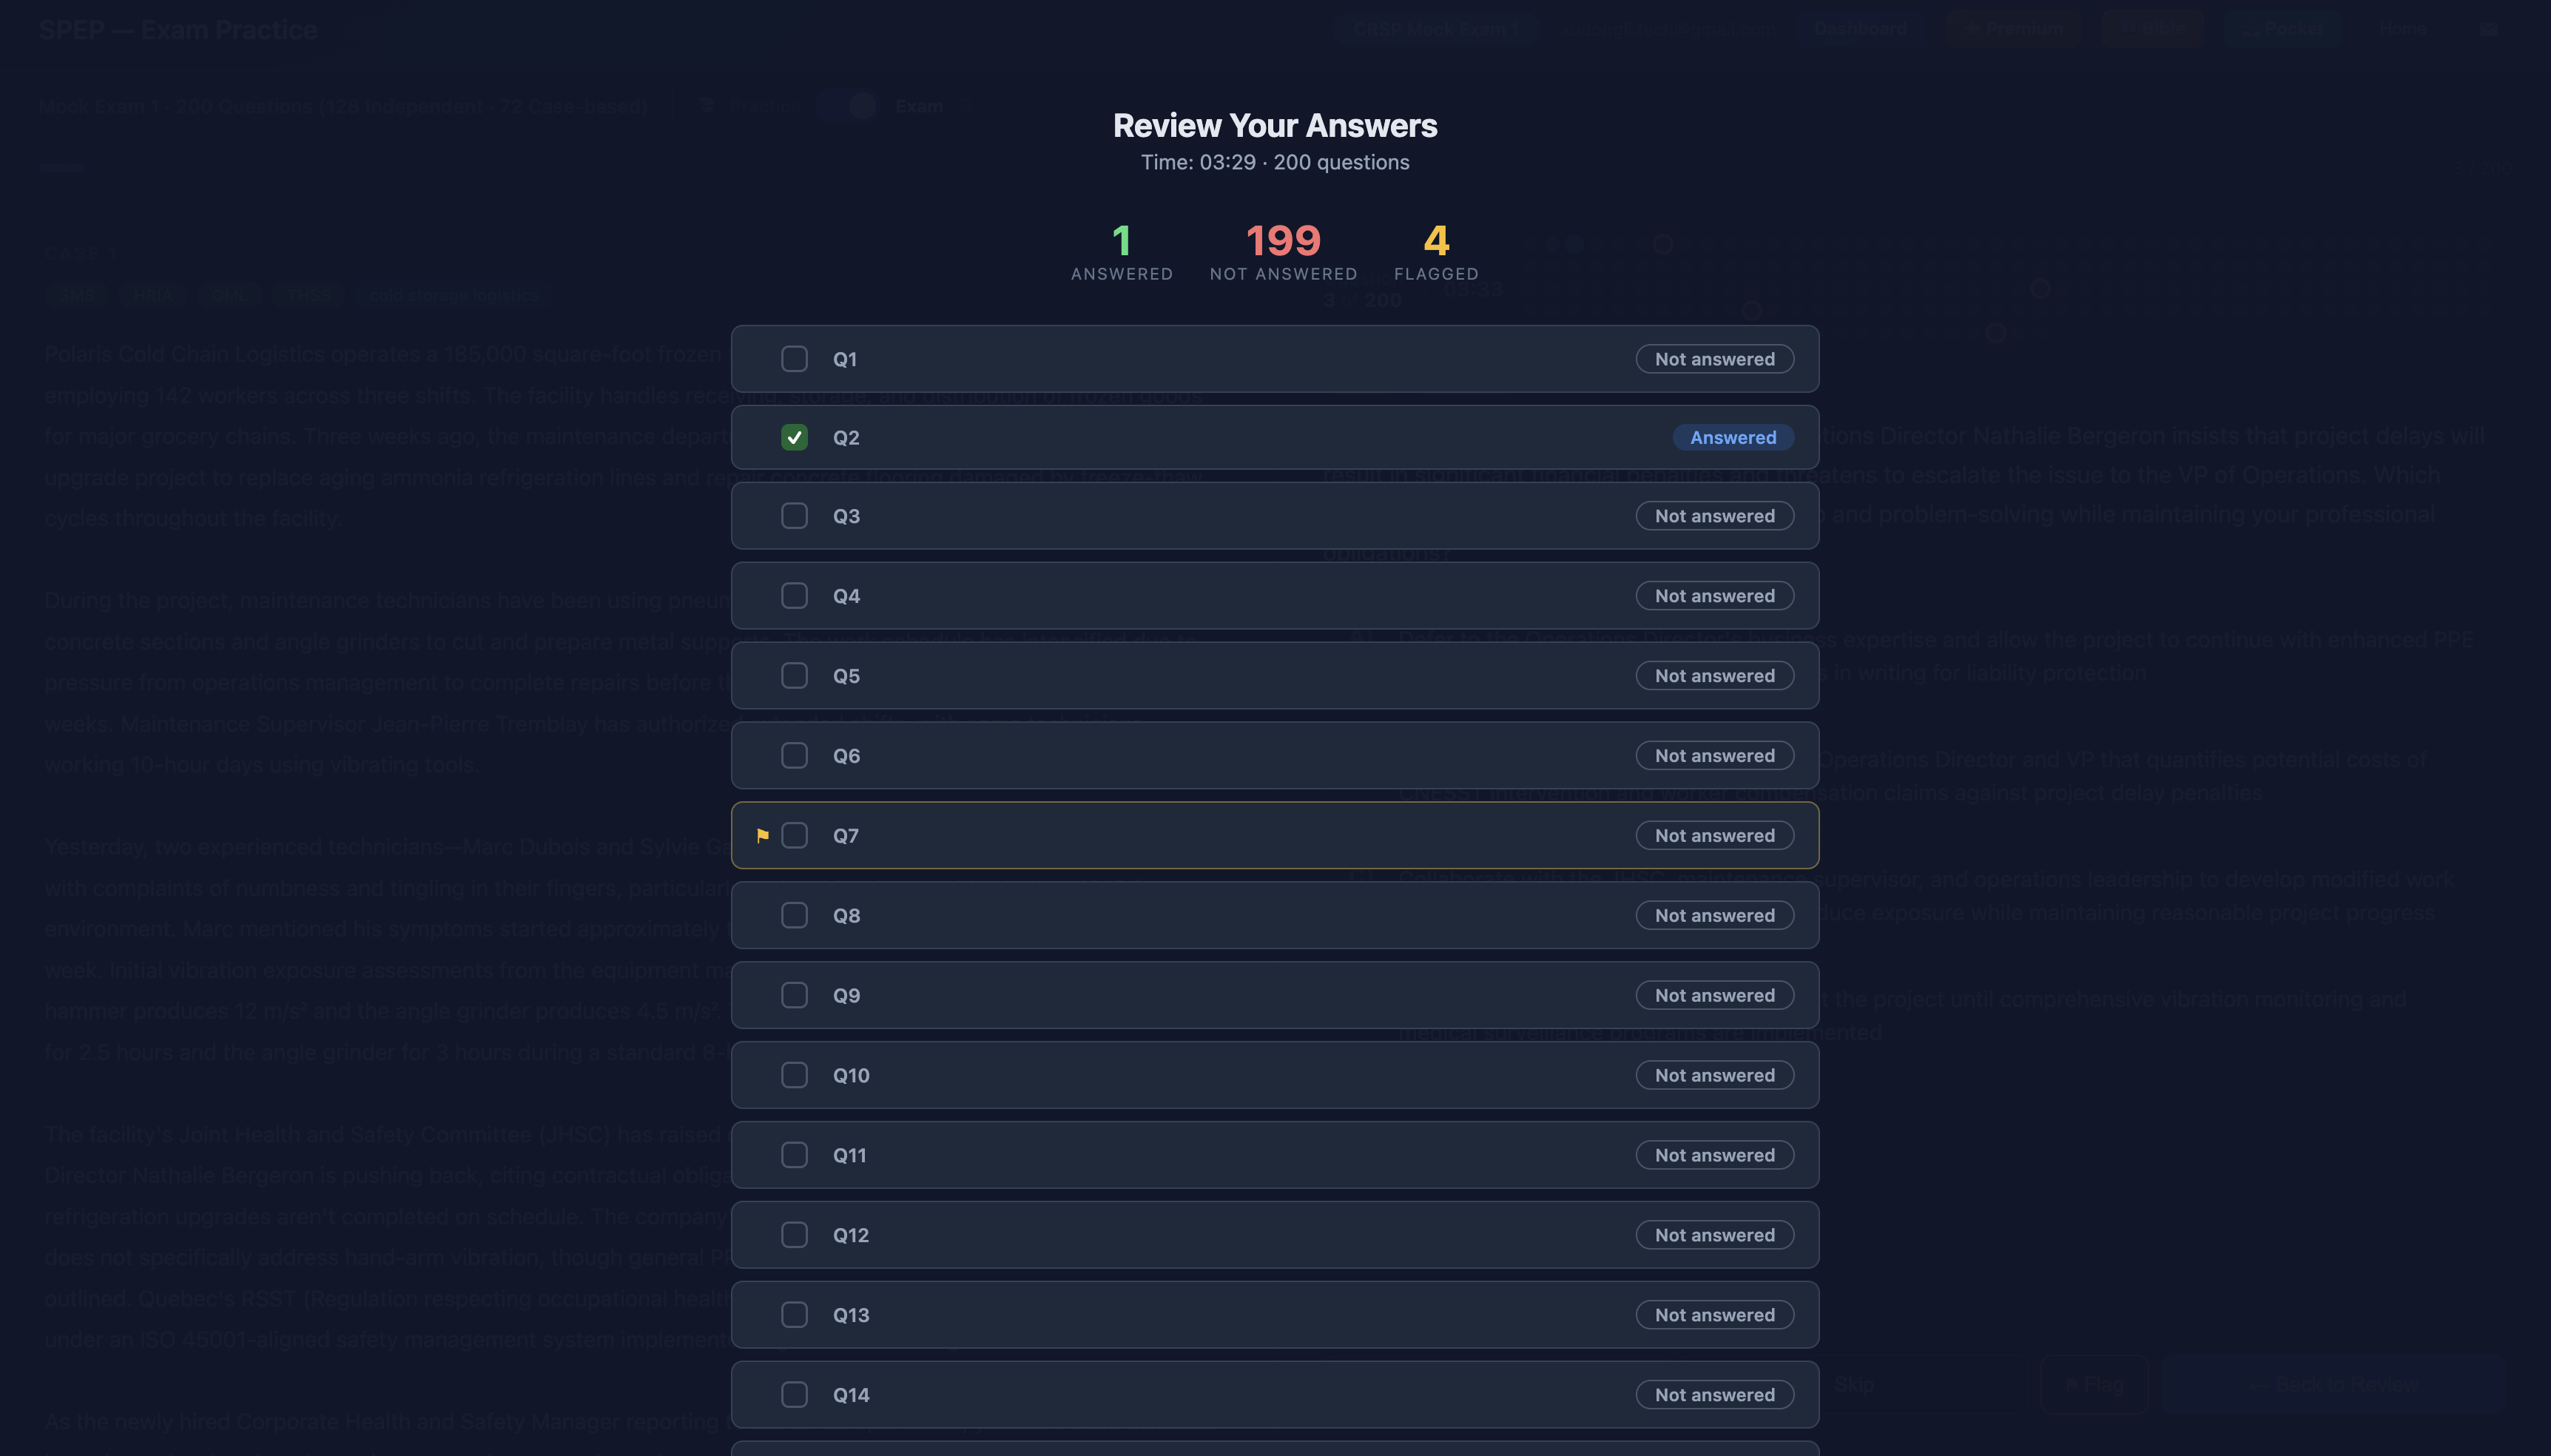
Use this screen deliberately. Scan for anything marked Not answered and anything flagged, and click straight back to those questions to finish or reconsider them. You can move freely between the review list and the questions as many times as you need — nothing is final yet.
Your last two minutes: review and submit
My rule: leave yourself one to two minutes at the end to return to the review page one final time, confirm there are no unintended blanks, and then hit Submit Exam. Submitting is the deliberate, final action — it won’t happen by accident, and it won’t happen just because you answered the last question. That design is on your side: it gives you a structured, calm way to close out the exam instead of a hard stop.
After you submit: results, then log out
Once you submit, the exam is done. Official results aren’t instant — expect them in roughly 4–6 weeks through BCRSP’s process (check their current timeline). Then you log out, collect your belongings from the locker, and walk out. That’s the whole day: methodical, structured, and far less mysterious than the anxiety beforehand makes it seem.
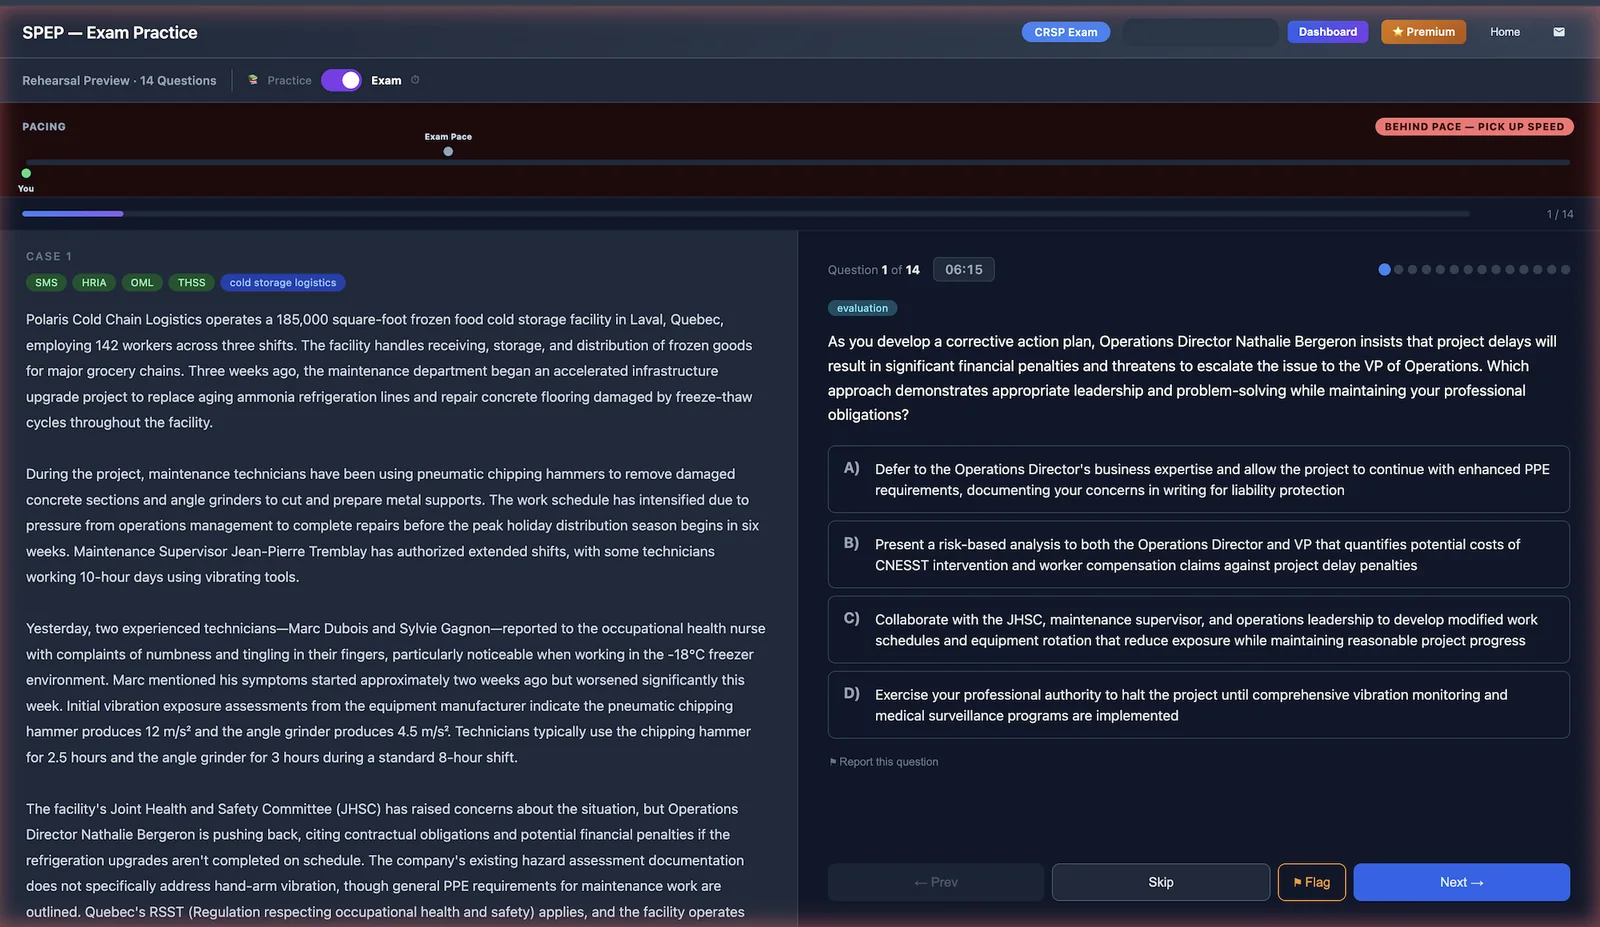
Real-Time Pacing Bar & Edge Glow — Know Exactly Where You Stand
The mock exam doesn’t just time you — it shows you, question by question, whether you’re ahead of or behind the real exam-day benchmark. A color-coded screen glow reinforces it: green when you’re on pace, amber when you’re falling behind, red when it’s urgent. Practice managing the clock, not just the content.
Live Pacing Bar Color-Coded Glow Real Exam BenchmarksWhy we built SPEP to feel exactly like this
The reason I’m describing all of this in detail is that familiarity is a performance advantage. On the real day, everything above should feel like a repeat of something you’ve already done — because you have. That’s why SPEP’s full-length mock exams mirror this flow deliberately: scenario on the left and questions on the right, 4–5 questions per scenario, a live timer, flag-and-return, and — crucially — the same review-then-submit screen you saw above. When the real interface looks identical to what you practised on, your attention goes entirely to the questions, not the mechanics.
Rehearse the Full 1:1 Mock Exam
This is the real thing, not a preview: a full-length CRSP mock exam (~200 questions) built to mirror exam day exactly — case-based scenarios first, a live timer with pacing feedback, flag-and-return, and the exact review-then-submit screen you just read about above.
Try the Mock Exam →Exam-day FAQ
Does my exam timer start when I arrive at the test center?
No. Check-in — showing ID, the security check, getting a locker, being seated — is off the clock. Your exam timer starts only when you begin the exam itself, and a visible countdown shows your remaining time from that point.
What ID do I need for the CRSP exam?
Typically two valid pieces of ID, with at least one government-issued photo ID, and the names must match your registration exactly. Always confirm the precise requirements in your appointment confirmation before the day — a name mismatch can cost you the appointment.
Can I bring my own scratch paper or a calculator?
No — the test center provides a pencil and scratch/erasable paper. Personal materials, phones, and smart watches go in your assigned locker. Check whether an on-screen calculator is provided for your exam; use the scratch paper for working through eliminations and unit conversions.
What happens when I answer the last question?
The exam does not submit automatically. You’re taken to a review screen that lists every question’s status — answered, not answered, and flagged. You can jump back to any question, finish your blanks, reconsider your flags, and only then press Submit Exam. Submitting is a deliberate final step.
Should I leave uncertain questions blank or guess?
In most cases, choose your best answer and flag it. That locks in a guess in case time runs out, while the flag reminds you to revisit it. Leaving a question genuinely blank is fine too — as long as it’s flagged so the review screen surfaces it. The one thing to avoid is an uncertain question that’s neither answered nor flagged.
When do I get my CRSP exam results?
Results aren’t instant. Expect roughly 4–6 weeks through BCRSP’s process — check their current published timeline, as it can change.